How Do You Install a Sump Pump in Your Basement or Cellar? A Complete Guide
If you’re experiencing rising water levels or struggling with flooding in your basement or cellar, installing a sump pump is the best solution. A basement sump pump will ensure the area remains dry and usable and protects your property from flooding.
This complete guide will cover everything you need to know about how to install a sump pump drain system in your basement. It includes:
- What is a basement sump pump?
- Can I handle the pump installation myself?
- How to choose a suitable sump pump for your basement
- How to choose the right sump pump location
- A step-by-step guide to installing a basement sump pump
- How long does it take to install a sump pump?
What is a basement sump pump?
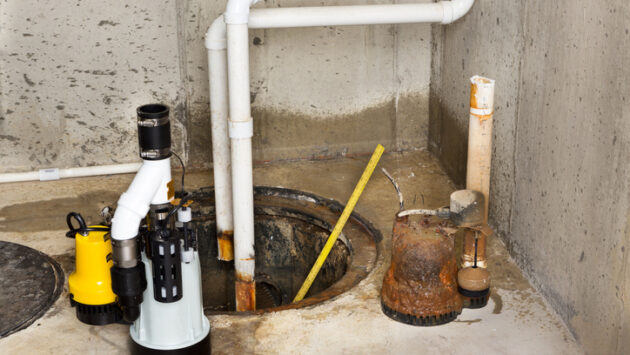
A basement or cellar pump is designed to pump out excess water that has accumulated in the sump pit (a small reservoir below your basement floor). The water is pumped into a drainage system and away from your property to prevent future flooding, protecting your home from water damage. A sump pump is an essential device for homes prone to flooding or high water levels.
The system consists of an electric motor, pump and float switch. The motor powers the pump, which draws liquid out of the sump pit and away from the basement. The float switch detects when the water level in the sump pit is over a certain threshold and starts the motor to pump out the water.
Read our blog, ‘What is a basement or cellar sump pump and how does it work?’, for more detailed information.
Can I handle the basement sump pump installation myself?
Installing a sump pit, pump and drainage system is a complex task. It requires professional installation by a qualified basement waterproofing contractor. You’ll also need an electrician for the wiring and electrical work.
How to choose a suitable sump pump for your basement
If you’re considering sump pump installation, choosing the correct system for your needs is crucial.
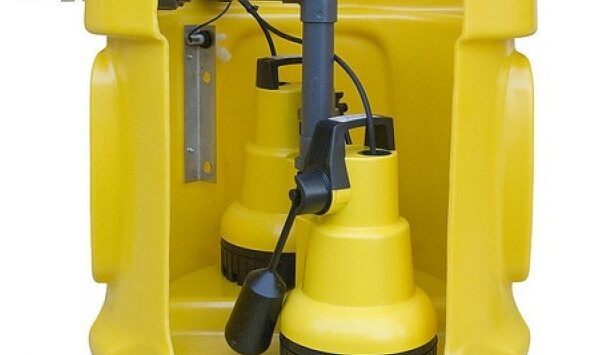
One of the main factors to consider is the type of sump pump you’ll need. Submersible sump pumps operate underwater. Pedestal pumps sit just above the sump pit, above the water line. Battery pumps rely on a battery instead of the mains electricity, perfect if you experience regular power outages. You can find out more detailed information here: 4 Types of Sump Pumps: How They Work.
The size of the sump must be big enough to handle the highest amount of water that may enter your basement. If you choose a size that is too small, it won’t be able to remove water efficiently. Choosing a size that is overly large can cause short cycling, leading to infrequent cycling and excessive wear.
Additionally, choosing the correct size and power of the pump will ensure efficient water removal. The pump must have a high enough horsepower to power its removal and to the required distance.
If you frequently experience power outages, a sump pump battery backup system should be installed. This will provide continued protection from flooding if the main power fails and give you peace of mind about the safety of your property.
All sump pump systems should also have a high water level alarm to alert you to high water levels in your chamber and avoid further damage to your basement and pump.
Plus, investing in a float switch will ensure your sump pump activates when high water levels are detected in the sump pit. This provides your foundations with an extra layer of protection from flooding.
How to choose the right sump pump location
Before starting the installation process, you should choose an appropriate location for your basement sump pump. Ensure the sump chamber is easily accessible for regular maintenance and to fix any issues that may arise. It is also recommended to position the pipework so it can be conveniently repaired or replaced in the future if necessary.
Here are some factors to consider when choosing your sump pump’s location:
- Where you will build block or stud walls after installation
- Whether it’s too close to the basement wall for the water to be pumped out
- If it avoids any underground cables or pipes
- If there’s suitable access for maintenance and repairs
A step-by-step guide to installing a basement sump pump
How to install a basement sump pump chamber
The first step should be to install the sump chamber (also known as a sump hole or pit). This process will differ whether you’re building a new basement or installing a sump pump in an existing basement. In both cases, you’ll need to create a hole in the floor for the chamber to sit in.
For sump chamber installation in new basements, you need to dig a hole big enough for the sump chamber to sit in. Be careful not to dig too far down that you hit water – you must do your research to know how to avoid this. The access lid to the chamber should finish flush with the screed, and you should have at least a 150mm concrete slab for the chamber to sit firmly on.
In most cases, the chamber will sit in the hole within a concrete box or steel cage. A structural engineer should be consulted to ensure the stability of this structure.
For adding a sump pump to an existing basement, you’ll need to break through the existing screed to create the hole, which must be large enough for the sump chamber. Then, follow the above directions to set a suitable concrete base and surrounding.
Once this is complete, backfill the tank with a mass concrete mix of at least 100mm thickness.
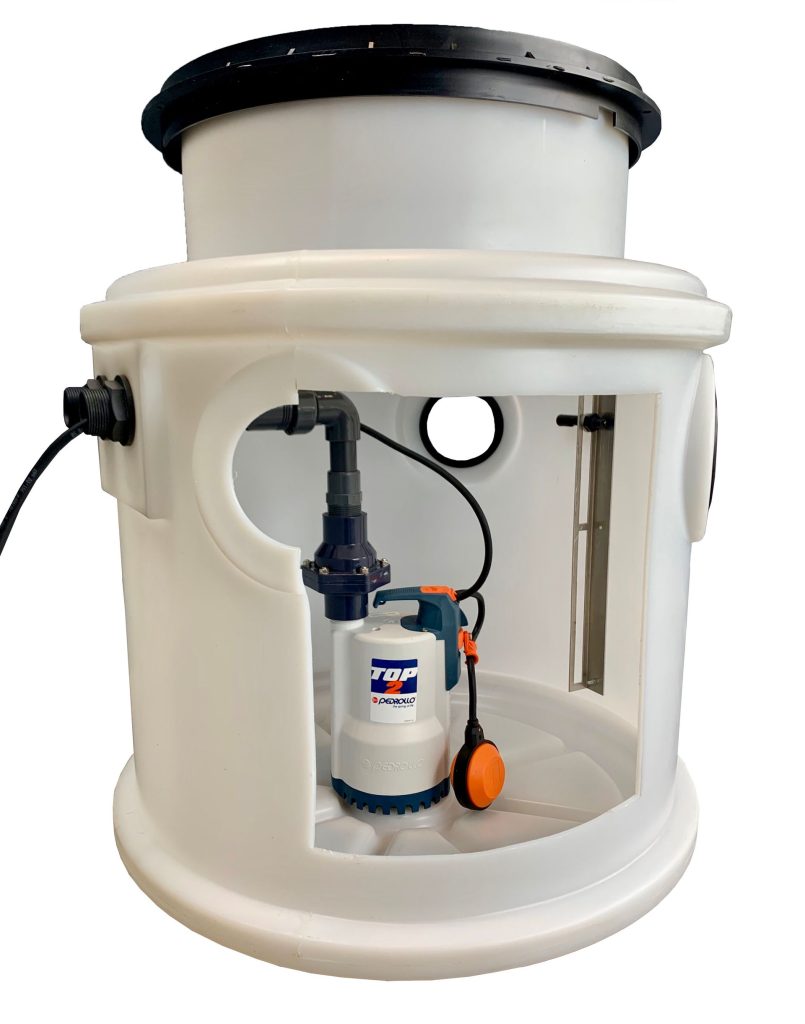
How to plumb your sump tank
You’ll need to consider several connections when plumbing your sump tank, including:
- The inlets (at least two) that go into your sump chamber from your drainage channel.
- High-voltage electrical inlets (for your pumps) and low-voltage electrical inlets (for your alarms).
- Waste outlets or discharge pipes with non-return or check valves.
- Internal PVC pipes.
Once the sump tank has been installed and all the necessary connections have been made, you’ll need to flush the system before the pumps are installed. Flushing it with clean water removes any sand, dust or debris from the system.
It should be noted that debris must not be removed via the pump as it could invalidate its warranty. Flushing it before the pump is attached will ensure this doesn’t happen.
How to install the sump pump
The sump pump can now be installed, which is one of the most challenging and complex aspects of the installation. The process will differ based on whether you’re installing a single or dual sump pump system.
For a single-pump system, you should use PTFE tape around the thread of the non-return valve and connect the waste pipework. You must mount the float and high-level alarm to the waste pipe.
For a dual pump system, you must follow the above steps after you’ve designated one pump as the master and one as the backup pump. You’ll have to ensure that the master pump activates first by attaching the high-level alarm switch on the master pump’s waste pipe just above the activation point. This ensures the alarm will be triggered if the master pump fails or can’t cope with the high water levels. After this, you can connect the internal waste pipes.
How to wire a sump pump
You’ll need a qualified electrician to wire the sump pump to the mains to complete the electrical installation. You should install the backup battery and high-level water alarm at this point. The alarm should be installed where it can be heard by the occupants so that action can be taken if it sounds.
The sump pump installation is now complete. Your pumps should automatically activate when the float reaches the pre-set water level, and the high water alarm should alert you to any issues.
How long does it take to install a sump pump?
The time it takes depends on the complexity of the installation. If this is the property’s first sump pump, more time is needed to create the sump pit from scratch. This can sometimes take up to 8 hours.
If you’re installing a replacement sump pump, the installation averages between 2 and 4 hours. A plumbing professional will have a quicker turnaround time than a DIY project, so this is something to consider when deciding how to install one.
Basement and cellar pumping stations
If you need a sump pump, Sumps and Pumps stocks a range of pumping stations designed for cellars and basements. We offer a range of sump chamber sizes and both single and twin pump systems to suit various needs and requirements.
You can choose from our budget-friendly pumping stations, which require some assembly or our professional, ready-to-go cellar sump pump stations. All our sump pumps are designed with easy installation in mind, and many feature a squat chamber so that the installer doesn’t have to dig too deep to install it.
We also offer high water level alarms, battery backups, pump control panels, and waterproofing products, making us a one-stop shop for all your sump pump installation needs.
Browse our full range of sump pumps, pumping stations and accessories in our online shop. Or, if you’d like more guidance on the right sump pump for your basement, please contact our team.